Accessing home-made apt Repository on S3 from Ubuntu in private subnet
The following page shows how to create a yum repository on S3.
This time, we will build an apt repository on S3 and access it from Ubuntu located on a private subnet.
Environment
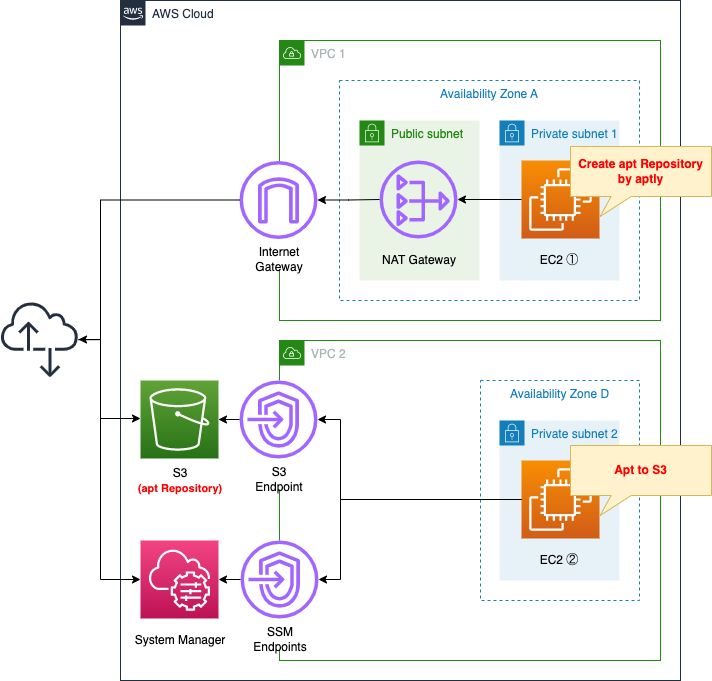
Create two VPCs.
One VPC is for creating the apt repository.
Deploy the latest Ubuntu instance and create a repository using aptly.
This time we will create a repository to install Apache from a private subnet.
On the other VPC, deploy a verification instance of your home-made repository.
No Internet or NAT gateway will be placed in this VPC, and the S3 bucket will be accessed via the VPC endpoint for S3.
CloudFormation Template Files
The above configuration is built with CloudFormation.
The CloudFormation template is located at the following URL
https://github.com/awstut-an-r/awstut-fa/tree/main/032
Explanation of key points of the template files
Enable S3 static website hosting
Check the S3 bucket.
The key point is the settings related to static website hosting.
Resources:
  Bucket:
    Type: AWS::S3::Bucket
    Properties:
      BucketName: !Ref Prefix
      AccessControl: Private
      WebsiteConfiguration:
        IndexDocument: index.html
Code language: YAML (yaml)
The WebsiteConfiguration property sets the static website hosting functionality.
By enabling this function, HTTP communication from apt clients can be accepted.
The point to note is the IndexDocument property.
Set “index.html” to this property.
This is because the hosting function cannot be activated without setting this property.
Therefore, although the index file is not actually set up, it is set as a formality.
Restricting access with bucket policy
Restrict access to the created buckets using a bucket policy.
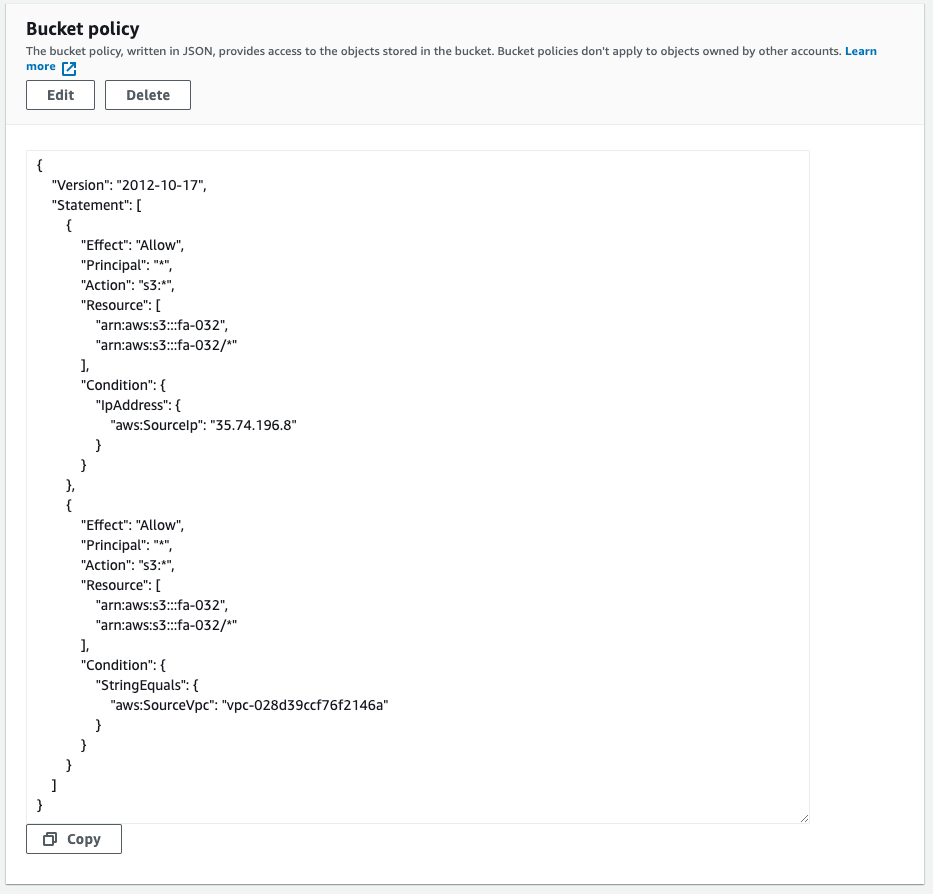
The key point is the conditions under which access is allowed.
This time, we will use the following policy to restrict access.
- Allow access if the source IP address is an Elastic IP address assigned to the NAT gateway * For instances in VPC1
- If the source VPC is VPC2, allow access * For instances in VPC2
Resources:
  BucketPolicy:
    Type: AWS::S3::BucketPolicy
    Properties:
      Bucket: !Ref Bucket
      PolicyDocument:
        Version: 2012-10-17
        Statement:
          - Action:
              - s3:*
            Effect: Allow
            Resource:
              - !Sub "arn:aws:s3:::${Bucket}"
              - !Sub "arn:aws:s3:::${Bucket}/*"
            Condition:
              IpAddress:
                "aws:SourceIp":
                  - !Ref EIP
            Principal: "*"
          - Action:
              - s3:*
            Effect: Allow
            Resource:
              - !Sub "arn:aws:s3:::${Bucket}"
              - !Sub "arn:aws:s3:::${Bucket}/*"
            Condition:
              StringEquals:
                "aws:SourceVpc":
                  - !Ref VPC
            Principal: "*"
Code language: YAML (yaml)
Two policies are defined.
The first policy is for allowing access from instance 1.
The Condition property is the key point.
By setting “aws:SourceIp” and the Elastic IP address assigned to the NAT gateway in the IpAddress property, the policy allows communication from the same address.
When instance 1 accesses the S3 bucket, it goes through the NAT gateway and the source address is replaced with the Elastic IP address.
The second policy is to allow access from instance 2.
Here, too, the condition is set with the Condition property.
By setting “aws:SourceVpc” and the ID of VPC2 in the StringEquals property, the policy allows communication from within the same VPC.
VPC Endpoint for S3
VPC2 does not create a point of contact with the Internet, but accesses S3 buckets through VPC endpoint.
Resources:
  S3Endpoint:
    Type: AWS::EC2::VPCEndpoint
    Properties:
      RouteTableIds:
        - !Ref PrivateRouteTable
      ServiceName: !Sub "com.amazonaws.${AWS::Region}.s3"
      VpcId: !Ref VPC
Code language: YAML (yaml)
No special configuration is required.
Set S3 to the ServiceName property.
The VPC endpoint for S3 is a gateway type, so set the VPC2 ID and the route table associated with the subnet in the same VPC.
Create repository with aptly
To create an apt repository, check what to run on instance 1.
Resources:
  RunShellScriptAssociation1:
    Type: AWS::SSM::Association
    Properties:
      AssociationName: !Sub "${Prefix}-runshellscript-association1"
      Name: AWS-RunShellScript
      Parameters:
        commands:
          - "sudo apt update"
          - "sudo apt install -y aptly"
          - "sudo apt install -y unzip"

          - "curl 'https://awscli.amazonaws.com/awscli-exe-linux-aarch64.zip' -o 'awscliv2.zip'"
          - "unzip awscliv2.zip"
          - "sudo ./aws/install"


          - !Sub |
              sudo cat << EOF > ./gpg.txt
              Key-Type: RSA
              Subkey-Type: RSA
              Key-Length: 2048
              Subkey-Length: 2048
              Expire-Date: 0
              Name-Real: ${GPGName}
              Name-Email: ${GPGEmail}
              Passphrase: ${GPGPassphrase}
              EOF
          - "sudo gpg1 --gen-key --batch ./gpg.txt"

          - "sudo gpg1 --no-default-keyring --keyring trustedkeys.gpg --keyserver keyserver.ubuntu.com --recv-keys 40976EAF437D05B5 3B4FE6ACC0B21F32"
          - !Sub "sudo aptly mirror create -architectures=${Arch} -filter='apache2' -filter-with-deps myrepo http://ap-northeast-1a.clouds.ports.ubuntu.com/ubuntu-ports/ xenial main restricted universe multiverse"
          - !Sub "sudo aptly mirror update ${Repository}"
          - !Sub "sudo aptly snapshot create ${Repository}-${SnapshotSuffix} from mirror ${Repository}"

          - !Sub |
              sudo cat << EOF > /root/.aptly.conf
              {
                "rootDir": "/root/.aptly",
                "downloadConcurrency": 4,
                "downloadSpeedLimit": 0,
                "architectures": [],
                "dependencyFollowSuggests": false,
                "dependencyFollowRecommends": false,
                "dependencyFollowAllVariants": false,
                "dependencyFollowSource": false,
                "dependencyVerboseResolve": false,
                "gpgDisableSign": false,
                "gpgDisableVerify": false,
                "gpgProvider": "gpg",
                "downloadSourcePackages": false,
                "skipLegacyPool": true,
                "ppaDistributorID": "ubuntu",
                "ppaCodename": "",
                "skipContentsPublishing": false,
                "FileSystemPublishEndpoints": {},
                "S3PublishEndpoints": {
                  "fa-032": {
                    "region": "${AWS::Region}",
                    "bucket": "${Bucket}"
                  }
                },
                "SwiftPublishEndpoints": {}
              }
              EOF

          - !Sub "sudo aptly publish snapshot -batch -passphrase='${GPGPassphrase}' ${Repository}-${SnapshotSuffix} s3:${Bucket}:"

          - "sudo gpg1 --export --armor > ./gpg.pub"
          - !Sub "aws s3 cp ./gpg.pub s3://${Bucket}/"
      Targets:
        - Key: InstanceIds
          Values:
            - !Ref Instance1
      WaitForSuccessTimeoutSeconds: !Ref WaitForSuccessTimeoutSeconds
Code language: YAML (yaml)
This time, as part of the instance initialization process, the SSM document AWS-RunShellScript will be executed to create a repository.
For more information on the initialization process using this document, please refer to the following page
As mentioned at the beginning, aptly creates a repository and publish it to an S3 bucket.
In the commands property, define the actual command to be executed.
The commands are as follows
- Preparation (package update, aptly install, AWS CLI install)
- Create public key with GnuPG in batch mode
- Get the public key for the original repository (http://ap-northeast-1a.clouds.ports.ubuntu.com/ubuntu-ports/), create a mirror repository, and create a snapshot
- Put the S3 bucket information in the aptly config file and publish the snapshot to the S3 bucket in batch mode.
- Export the public key of the key used when signing the repository and upload it to the S3 bucket using the AWS CLI.
Note is the version of GnuPG that Aptly supports.
Aptly at this time only supports GNUPG 1.x for server-side use. On newer Debian systems you’ll want to make sure that the gnupg1 and gpgv1 packages are installed.
PGP PROVIDERS
As stated above, only 1.x is considered to be supported, so be careful not to use 2.x.
Therefore, this time we explicitly use 1.x by using the “gpg1” command instead of the “gpg” command.
Another point to note is about the permissions for accessing the S3 bucket from aptly.
The official site shows how to use an IAM user’s access key with the necessary permissions.
awsAccessKeyID, awsSecretAccessKey: (optional) Amazon credentials to access S3 bucket. If not supplied, environment variables AWS_ACCESS_KEY_ID and AWS_SECRET_ACCESS_KEY are used.
PUBLISHING TO AMAZON S3
This time, however, there is no need to set parameters or specify environment variables as described above.
This is because the aforementioned S3 bucket policy allows access from both instances.
For more information on how to use aptly, please refer to the following site
https://gihyo.jp/admin/serial/01/ubuntu-recipe/0485
https://qiita.com/roki18d/items/0f63a85292df1ef511c5
Register home-made repository in apt
Confirm the contents to be executed at instance 2.
The key point is how to refer to the home-made apt repository.
Resources:
  RunShellScriptAssociation2:
    Type: AWS::SSM::Association
    DependsOn:
      - RunShellScriptAssociation1
    Properties:
      AssociationName: !Sub "${Prefix}-runshellscript-association2"
      Name: AWS-RunShellScript
      Parameters:
        commands:
          - !Sub "curl ${BucketWebsiteURL}/gpg.pub | sudo apt-key add -"
          - !Sub |
              sudo cat << EOF > /etc/apt/sources.list
              deb ${BucketWebsiteURL}/ xenial main
              EOF
      Targets:
        - Key: InstanceIds
          Values:
            - !Ref Instance2
      WaitForSuccessTimeoutSeconds: !Ref WaitForSuccessTimeoutSecondsThis also executes the SSM document AWS-RunShellScript and performs the necessary processing for the home-made repository reference.
The command is as follows
- Import the public key placed in the S3 bucket
- Place /etc/apt/sources.list describing the home-made repository
Code language: YAML (yaml)
This also executes the SSM document AWS-RunShellScript and performs the necessary processing for the home-made repository reference.
The command is as follows
- Import the public key placed in the S3 bucket
- Place /etc/apt/sources.list describing the home-made repository
Architecting
Use CloudFormation to build this environment and check the actual behavior.
Create CloudFormation stacks and check resources in stacks
Create a CloudFormation stacks.
For information on how to create stacks and check each stack, please refer to the following page

After checking the resources in each stack, information on the main resources created this time is as follows
- S3 bucket: fa-032
- S3 bucket website endpoint: http://fa-032.s3-website-ap-northeast-1.amazonaws.com
- Instance 1: i-09467a9a4e6bb9bc4
- Instance 2: i-063843a7185abe446
The resource creation status is also checked from the AWS Management Console.
First is the instance creation status.
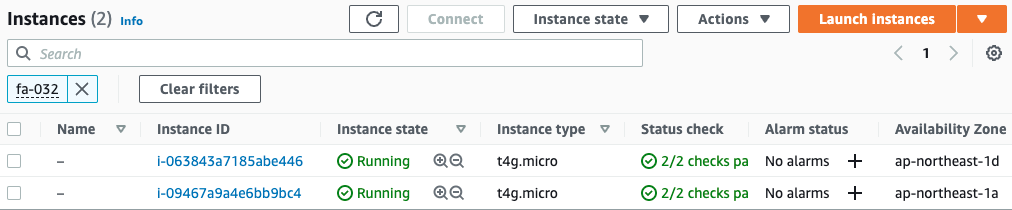
Indeed, two instances have been created.
Next, we check the execution results of the SSM document on both instances.
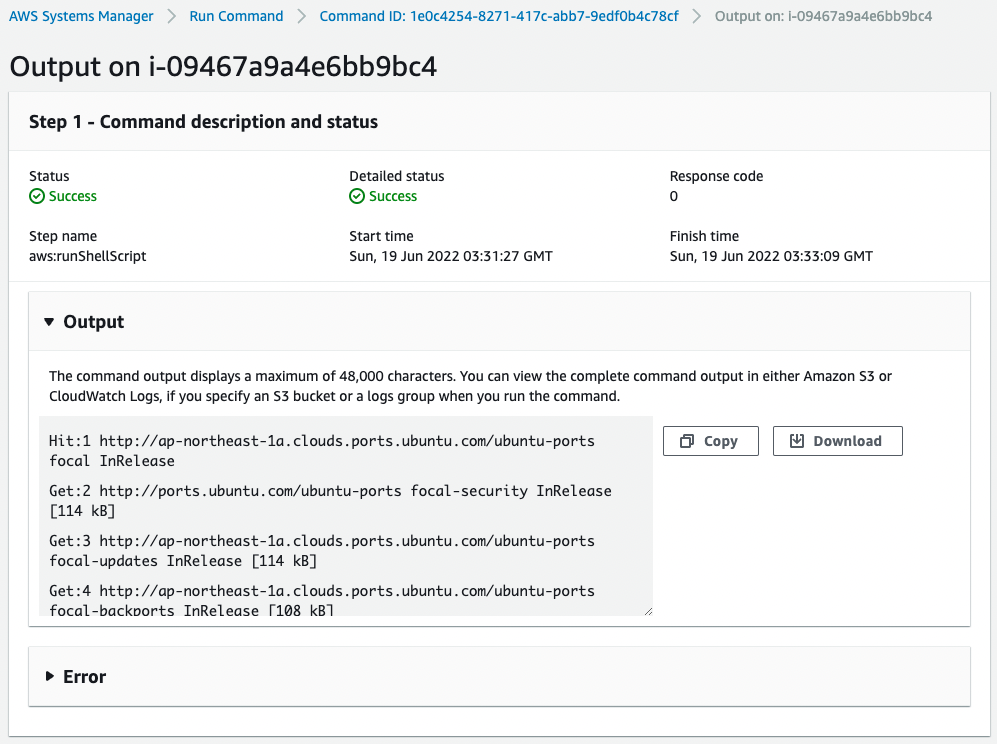
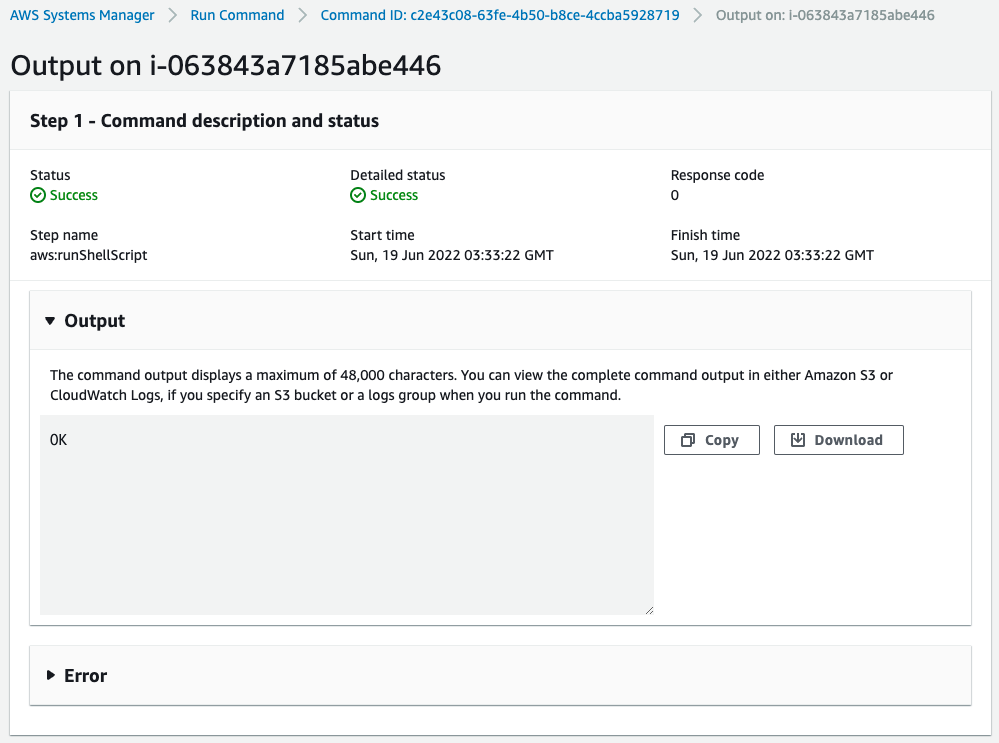
You can check the execution results from Output.
Check the S3 bucket.
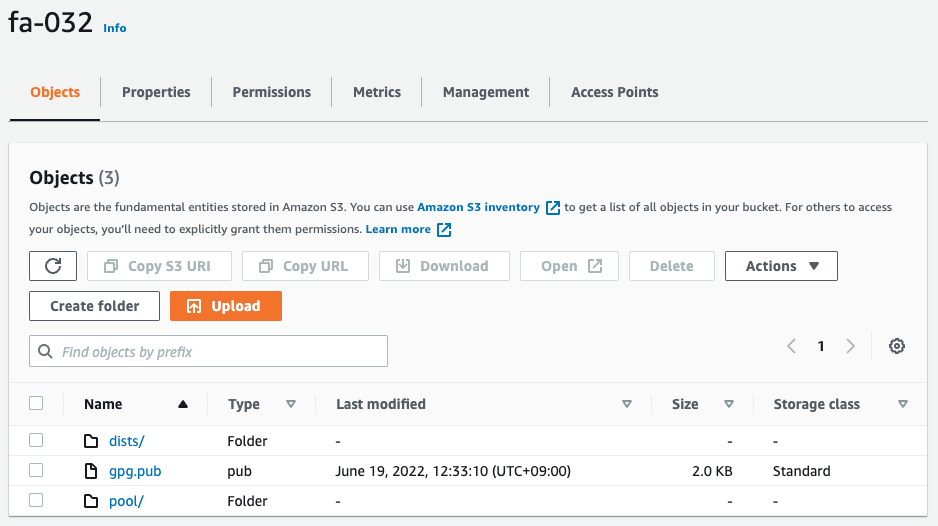
You can see that the repository file uploaded by aptly and the public key of this repository are located there.
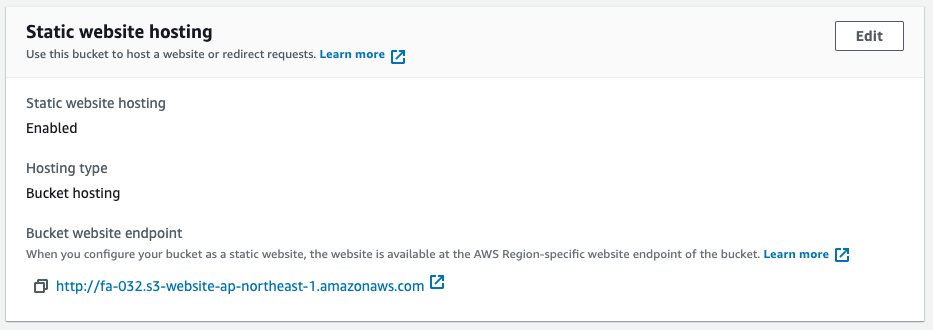
We can also see that the static website hosting feature is enabled and ready to accept HTTP requests.
The bucket policy allows access from the NAT gateway address and from VPC2.
This means that both instances can access the S3 bucket.
Checking Action
Now that everything is ready, access instance 2.
To access the instance, use SSM Session Manager.
% aws ssm start-session --target i-063843a7185abe446

Starting session with SessionId: root-05d2fb1be2c79590b

$Code language: Bash (bash)
For more information, please refer to the following page
Check the registration status of the public key.
$ sudo apt-key list
/etc/apt/trusted.gpg
--------------------
pub   rsa2048 2022-06-19 [SCEA]
      1133 C594 73B1 E2D9 5E32  09A2 BD71 F30D 3250 8A8D
uid           [ unknown] fa-032 <fa-032@example.com>
sub   rsa2048 2022-06-19 [SEA]

...
Code language: Bash (bash)
The verification key for home-made repository is registered.
Check the file for registration of home-made repository.
$ sudo cat /etc/apt/sources.list
deb http://fa-032.s3-website-ap-northeast-1.amazonaws.com/ xenial main
Code language: Bash (bash)
Sure enough, your home-made repository is registered.
Update the package list.
$ sudo apt update
Get:1 http://fa-032.s3-website-ap-northeast-1.amazonaws.com xenial InRelease [3170 B]
Get:2 http://fa-032.s3-website-ap-northeast-1.amazonaws.com xenial/main arm64 Packages [31.8 kB]
Fetched 34.9 kB in 0s (151 kB/s)
Reading package lists... Done
Building dependency tree
Reading state information... Done
All packages are up to date.
Code language: Bash (bash)
The home-made repository has been accessed and successfully updated.
This means that the aforementioned key was used for verification.
Install Apache.
$ sudo apt install -y apache2
Reading package lists... Done
Building dependency tree
Reading state information... Done
The following additional packages will be installed:
  apache2-bin apache2-data apache2-utils libapr1 libaprutil1 libaprutil1-dbd-sqlite3 libaprutil1-ldap liblua5.1-0 libssl1.0.0
Suggested packages:
  www-browser apache2-doc apache2-suexec-pristine | apache2-suexec-custom
Recommended packages:
  ssl-cert
The following NEW packages will be installed:
  apache2 apache2-bin apache2-data apache2-utils libapr1 libaprutil1 libaprutil1-dbd-sqlite3 libaprutil1-ldap liblua5.1-0 libssl1.0.0
0 upgraded, 10 newly installed, 0 to remove and 0 not upgraded.
Need to get 2061 kB of archives.
After this operation, 8762 kB of additional disk space will be used.
Get:1 http://fa-032.s3-website-ap-northeast-1.amazonaws.com xenial/main arm64 libapr1 arm64 1.5.2-3 [71.1 kB]
Get:2 http://fa-032.s3-website-ap-northeast-1.amazonaws.com xenial/main arm64 libssl1.0.0 arm64 1.0.2g-1ubuntu4 [726 kB]
Get:3 http://fa-032.s3-website-ap-northeast-1.amazonaws.com xenial/main arm64 libaprutil1 arm64 1.5.4-1build1 [67.4 kB]
Get:4 http://fa-032.s3-website-ap-northeast-1.amazonaws.com xenial/main arm64 libaprutil1-dbd-sqlite3 arm64 1.5.4-1build1 [9656 B]
Get:5 http://fa-032.s3-website-ap-northeast-1.amazonaws.com xenial/main arm64 libaprutil1-ldap arm64 1.5.4-1build1 [8358 B]
Get:6 http://fa-032.s3-website-ap-northeast-1.amazonaws.com xenial/main arm64 liblua5.1-0 arm64 5.1.5-8ubuntu1 [88.7 kB]
Get:7 http://fa-032.s3-website-ap-northeast-1.amazonaws.com xenial/main arm64 apache2-bin arm64 2.4.18-2ubuntu3 [764 kB]
Get:8 http://fa-032.s3-website-ap-northeast-1.amazonaws.com xenial/main arm64 apache2-utils arm64 2.4.18-2ubuntu3 [77.5 kB]
Get:9 http://fa-032.s3-website-ap-northeast-1.amazonaws.com xenial/main arm64 apache2-data all 2.4.18-2ubuntu3 [162 kB]
Get:10 http://fa-032.s3-website-ap-northeast-1.amazonaws.com xenial/main arm64 apache2 arm64 2.4.18-2ubuntu3 [86.7 kB]
...
Code language: Bash (bash)
The installation was successfully completed from the home-made repository.
Finally, we check the operation status of Apache.
$ sudo systemctl status apache2
● apache2.service - LSB: Apache2 web server
     Loaded: loaded (/etc/init.d/apache2; generated)
    Drop-In: /usr/lib/systemd/system/apache2.service.d
             └─apache2-systemd.conf
     Active: active (running) since Sun 2022-06-19 03:58:31 UTC; 1min 54s ago
       Docs: man:systemd-sysv-generator(8)
      Tasks: 55 (limit: 1061)
     Memory: 4.6M
     CGroup: /system.slice/apache2.service
             ├─2221 /usr/sbin/apache2 -k start
             ├─2224 /usr/sbin/apache2 -k start
             └─2225 /usr/sbin/apache2 -k start

Jun 19 03:58:30 ip-10-0-1-205 systemd[1]: Starting LSB: Apache2 web server...
Jun 19 03:58:30 ip-10-0-1-205 apache2[2199]:  * Starting Apache httpd web server apache2
Jun 19 03:58:31 ip-10-0-1-205 apache2[2199]:  *
Jun 19 03:58:31 ip-10-0-1-205 systemd[1]: Started LSB: Apache2 web server.
Code language: Bash (bash)
Action is normal.
Summary
We have seen how to build a home-made apt repository on S3.
By creating and referencing a home-made repository, even an Ubuntu instance located on a private subnet could install any package without access to the Internet.