Introduction to ElastiCache (Redis Cluster Disabled) with CloudFormation
ElastiCache is an in-memory caching service provided by AWS.
In this introduction, we will create ElastiCache for Redis (cluster disabled).
Environment
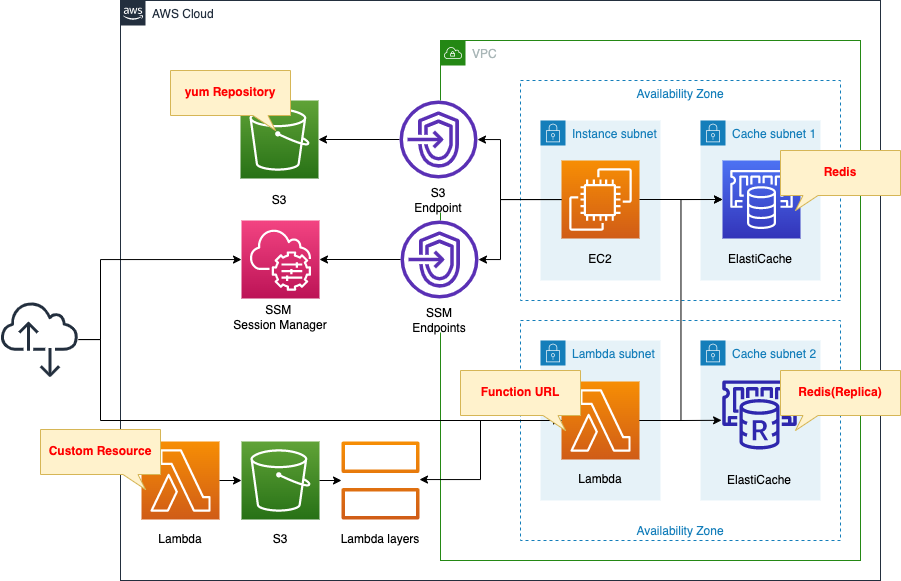
We will create three main resources.
The first is ElastiCache.
We will create two nodes to be used as the primary and replica, respectively.
The second is an EC2 instance.
It will be used as a client to connect to ElastiCache.
The OS is the latest version of Amazon Linux 2.
The third is a Lambda function.
This is also used as a client to connect to ElastiCache.
The runtime environment is Python 3.8.
Create two types of VPC endpoints for the EC2 instance.
The first type is for S3. This is used to install redis-cli on the instance.
The second type is for SSM. Used to connect to the instance via SSM Session Manager.
Use a CloudFormation custom resource to automate Lambda layer creation.
Associate a Lambda function to the custom resource and configure it to create a layer package and place it in an S3 bucket when the CloudFormation stack is created.
CloudFormation template files
Build the above configuration with CloudFormation.
The CloudFormation templates are located at the following URL
https://github.com/awstut-an-r/awstut-fa/tree/main/063
Explanation of key points of template files
ElastiCache for Redis (Cluster Disabled)
To create ElastiCache, at least the following two resources must be created
- Subnet group
- Cluster group OR replication group
Subnet Group
Resources:
  SubnetGroup:
    Type: AWS::ElastiCache::SubnetGroup
    Properties:
      CacheSubnetGroupName: !Sub "${Prefix}-subnetgroup"
      Description: !Sub "${Prefix}-SubnetGroup"
      SubnetIds:
        - !Ref CacheSubnet1
        - !Ref CacheSubnet2
Code language: YAML (yaml)
Specify two or more subnets in the SubnetIds property.
Note that if ElastiCache is multi-AZ, the AZs of the subnets specified here must be separated.
Replication Group or Cache Cluster
When creating ElastiCache itself with CloudFormation, you must create either of the following resources
- Replication Group: AWS::ElastiCache::ReplicationGroup
- Cache Cluster: AWS::ElastiCache::CacheCluster
When creating ElastiCache for Redis, you should choose the former when creating two or more nodes including read replica, and the latter when creating only one node.
In this case, we will create one read replica node in addition to the primary node, so we will create a replication group.
  ReplicationGroup:
    Type: AWS::ElastiCache::ReplicationGroup
    Properties:
      AutoMinorVersionUpgrade: true
      CacheNodeType: !Ref CacheNodeType
      CacheParameterGroupName: !Ref CacheParameterGroupName
      CacheSubnetGroupName: !Ref SubnetGroup
      Engine: !Ref CacheEngine
      EngineVersion: !Ref CacheEngineVersion
      MultiAZEnabled: true
      NodeGroupConfiguration:
        - PrimaryAvailabilityZone: !Sub "${AWS::Region}${AvailabilityZone1}"
          ReplicaAvailabilityZones:
            - !Sub "${AWS::Region}${AvailabilityZone2}"
          ReplicaCount: !Ref ReplicaCount
      Port: !Ref RedisPort
      ReplicationGroupDescription: !Sub "${Prefix}-ReplicationGroup"
      ReplicationGroupId: !Sub "${Prefix}-replicationgroup"
      SecurityGroupIds:
        - !Ref CacheSecurityGroup
Code language: YAML (yaml)
This section covers the key parameters.
The CacheNodeType property sets the type of node to be created.
Select “cache.t4g.micro” for the minimal configuration (vCPU: 2, memory: 0.5 GiB).
Specify the parameter group to be applied to the group in the CacheParameterGroupName property.
Parameter groups are resources for specifying Redis and Memcached parameters.
You can specify your own parameter group or use the default one created by AWS.
In this case, we will specify the default “default.redis6.x”.
Specify the subnet where the group will be placed in the CacheSubnetGroupName property.
Specify the subnet group as described above.
Specify the mode and version of ElastiCache in the Engine and EngineVersion properties.
Set “redis” to the former and “6.2” to the latter so that the latest version of Redis is created.
Enable the MultiAZEnabled property to improve system availability.
This replacement results in some downtime for the cluster, but if Multi-AZ is enabled, the downtime is minimized. The role of primary node will automatically fail over to one of the read replicas.
Minimizing downtime in ElastiCache for Redis with Multi-AZ
The NodeGroupConfiguration property is used to configure the detailed settings for the nodes to be created in the group.
The PrimaryAvailabilityZone property allows you to specify the AZ in which the primary node will be started.
On the other hand, in ReplicaAvailabilityZones property, you can specify the AZ in which the read replica nodes will be launched.
In the ReplicaCount property, you can specify the number of read replica nodes to be activated. In this case, only one node will be activated.
Port property allows you to specify the communication port to connect to ElastiCache.
Specify the normal port for Redis (6379/tcp).
In the SecurityGroupIds property, specify the security group to be applied to ElastiCache.
Create the following security groups and specify them in this property
Resources:
  CacheSecurityGroup:
    Type: AWS::EC2::SecurityGroup
    Properties:
      GroupName: !Sub "${Prefix}-CacheSecurityGroup"
      GroupDescription: Allow Redis from Instance and Function.
      VpcId: !Ref VPC
      SecurityGroupIngress:
        - IpProtocol: tcp
          FromPort: !Ref RedisPort
          ToPort: !Ref RedisPort
          SourceSecurityGroupId: !Ref InstanceSecurityGroup
        - IpProtocol: tcp
          FromPort: !Ref RedisPort
          ToPort: !Ref RedisPort
          SourceSecurityGroupId: !Ref FunctionSecurityGroup
Code language: YAML (yaml)
In this configuration, to connect to ElastiCache from an EC2 instance and a Lambda function, specify the security groups for both resources as the source and the aforementioned port for Redis (6379/tcp) as the port.
(Reference) EC2 Instance
Resources:
  Instance:
    Type: AWS::EC2::Instance
    Properties:
      IamInstanceProfile: !Ref InstanceProfile
      ImageId: !Ref ImageId
      InstanceType: !Ref InstanceType
      NetworkInterfaces:
        - DeviceIndex: 0
          SubnetId: !Ref InstanceSubnet
          GroupSet:
            - !Ref InstanceSecurityGroup
      UserData: !Base64 |
        #!/bin/bash -xe
        yum update -y
        amazon-linux-extras install redis6 -y
Code language: YAML (yaml)
EC2 instance to connect to ElastiCache for Redis.
No special configuration is required to connect to ElastiCache for Redis.
However, since we plan to connect using redis-cli, we will use user data to configure this tool to be installed during the initialization process.
For more information on the instance initialization process, please see the following page
During tool installation, yum is executed inside the instance.
Since the instance is located on a private subnet with no Internet access, yum usually fails to execute.
However, in the case of Amazon Linux 2 like this one, yum can be executed by accessing the yum repository built on the S3 bucket.
Therefore, we will create a VPC endpoint for S3 and prepare a route to access the S3 bucket.
For information on how to run yum on a private subnet, please refer to the following page
(Reference) Lambda Function
Resources:
  Function:
    Type: AWS::Lambda::Function
    Properties:
      Architectures:
        - !Ref Architecture
      Environment:
        Variables:
          PRIMARY_ENDPOINT_ADDRESS: !Ref CachePrimaryEndpointAddress
          READER_ENDPOINT_ADDRESS: !Ref CacheReaderEndPointAddress
          REDIS_PORT: !Ref RedisPort
      Code:
        ZipFile: |
          import json
          import os
          import redis

          primary_endpoint_address = os.environ['PRIMARY_ENDPOINT_ADDRESS']
          reader_endpoint_address = os.environ['READER_ENDPOINT_ADDRESS']
          redis_port = os.environ['REDIS_PORT']

          def lambda_handler(event, context):
            primary_redis = redis.Redis(
              host=primary_endpoint_address,
              port=redis_port
              )
            primary_redis.set('hogehoge', 'fugafuga')

            reader_redis = redis.Redis(
              host=reader_endpoint_address,
              port=redis_port
              )

            return {
              'statusCode': 200,
              'body': json.dumps(
                {
                  'primary_redis': primary_redis.get('hogehoge').decode(),
                  'reader_redis': reader_redis.get('hogehoge').decode()
                },
                indent=2
                )
            }
      FunctionName: !Sub "${Prefix}-function"
      Handler: !Ref Handler
      Layers:
        - !Ref LambdaLayer
      Runtime: !Ref Runtime
      Role: !GetAtt FunctionRole.Arn
      VpcConfig:
        SecurityGroupIds:
          - !Ref FunctionSecurityGroup
        SubnetIds:
          - !Ref LambdaSubnet
Code language: YAML (yaml)
Lambda function to connect to ElastiCache for Redis.
No special configuration is required to connect to ElastiCache for Redis.
You can define environment variables in the Environment property, but define the endpoint and port for the ElastiCache connection as variables.
Two types of endpoint variables are defined, one for the primary node connection and one for the read replica connection.
For the Redis connection library, use redis-py.
https://github.com/redis/redis-py
The code is as follows
- Access os.environ and get the endpoints and ports defined as environment variables.
- After connecting to the primary node using redis-py, save the test string and then retrieve it.
- After connecting to the read replica node using redis-py, retrieve the above string.
(Reference) Lambda Layer Package Creation
The aforementioned redis-py is a third-party library, so it is not provided in the default runtime environment.
Therefore, we will create a Lambda layer that contains this module and associate it with the Lambda function.
For more information on Lambda layers, please refer to the following page
In this case, we will use CloudFormation custom resources to automate the creation of the Lambda layer containing redis-py.
Specifically, we will automate the process of creating a Lambda layer package and placing it in an S3 bucket at a given location.
Resources:
  RequirementsParameter:
    Type: AWS::SSM::Parameter
    Properties:
      Name: !Ref Prefix
      Type: String
      Value: |
        redis

  CustomResource:
    Type: Custom::CustomResource
    Properties:
      ServiceToken: !GetAtt CustomResourceLambdaLayerFunction.Arn
Code language: YAML (yaml)
Prepare a list of libraries to include in the Lambda layer in the SSM parameter store.
Create a CloudFormation custom resource and define the execution of the package creation function when creating the CloudFormation stack.
The function reads the SSM parameter store, executes a pip to download the libraries, and then places them in a ZIP package in an S3 bucket.
For more details, please refer to the following page
Architecting
Use CloudFormation to build this environment and check the actual behavior.
Create CloudFormation stacks and check resources in stacks
Create CloudFormation stacks.
For information on how to create stacks and check each stack, please refer to the following page

After checking the resources in each stack, information on the main resources created this time is as follows
- ElastiCache: fa-063-replicationgroup
- ElastiCache primary endpoint: fa-063-replicationgroup.ryxnym.ng.0001.apne1.cache.amazonaws.com
- ElastiCache leader endpoint: fa-063-replicationgroup-ro.ryxnym.ng.0001.apne1.cache.amazonaws.com
- EC2 instance: i-040ea797576760e6e
- Function URL for Lambda function: https://74paff2horq7g3kjedafhr5pba0satxd.lambda-url.ap-northeast-1.on.aws/
Check each resource from the AWS Management Console.
First, check ElastiCache itself.
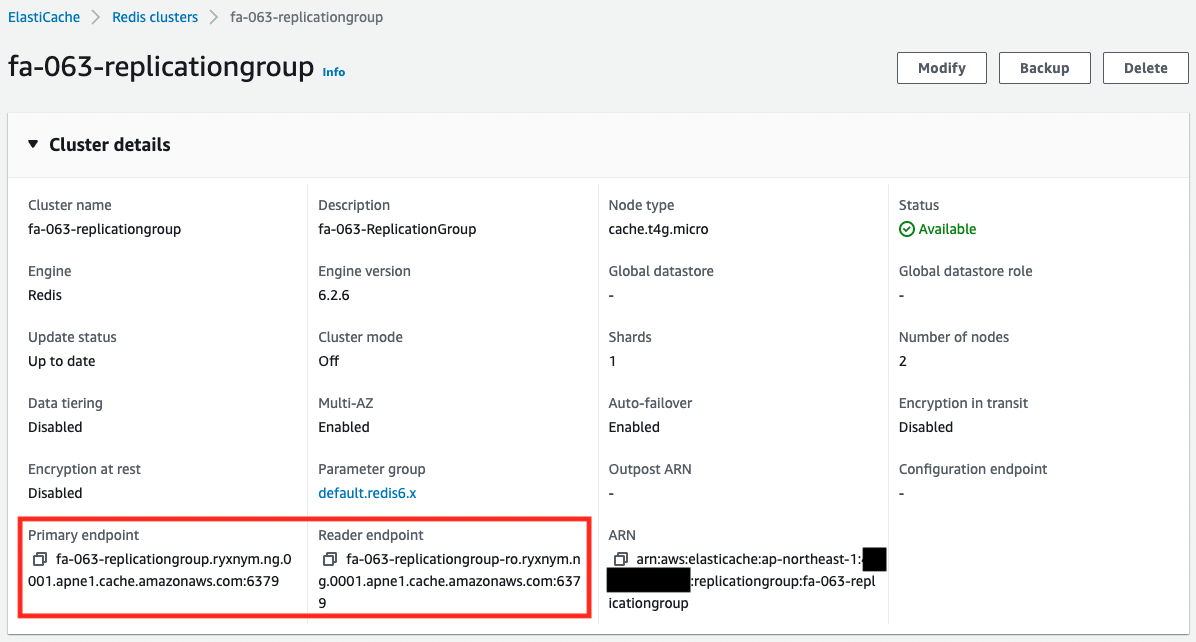

ElastiCache has been created as configured in the CloudFormation template.
On this page you can see the endpoints for the ElastiCache connection.
Two nodes have been created, one primary and one read replica.
Next, check the subnet group.
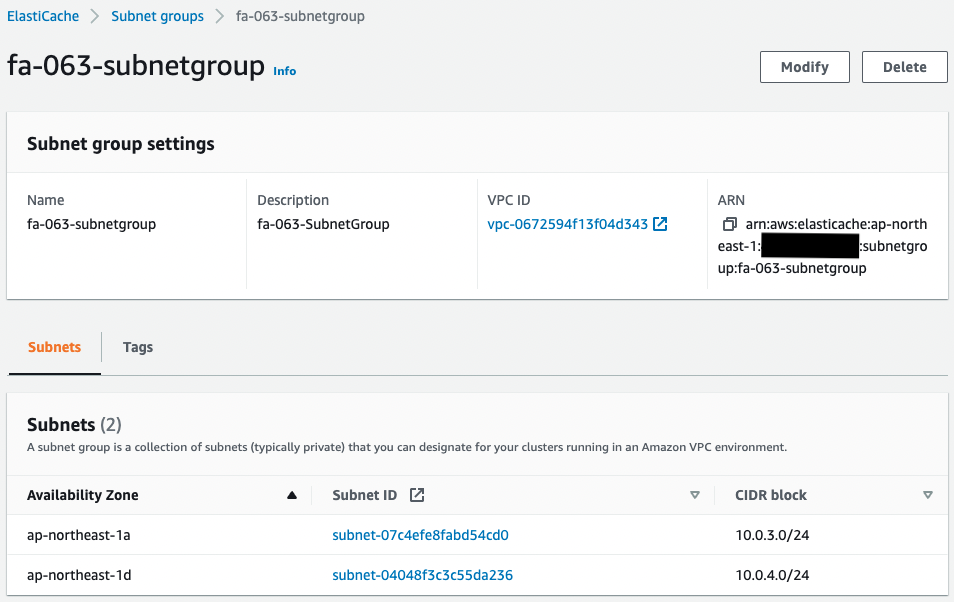
Two subnets are registered.
Different AZs are specified, and the primary node will be started on “10.0.3.0/24” and the lead replica node on “10.0.4.0/24”.
Checking Action
Now that everything is ready, let’s check the Operation.
Connecting to ElastiCache for Redis from EC2 instance
After accessing the EC2 instance, connect to ElastiCache.
Use SSM Session Manager to access the instance.
% aws ssm start-session --target i-040ea797576760e6e

Starting session with SessionId: root-02f6df0f40f0a01e9

sh-4.2$
Code language: Bash (bash)
For more information on SSM Session Manager, please refer to the following page
Check the execution status of the initialization process of the EC2 instance with user data.
[ssm-user@ip-10-0-1-17 bin]$ yum list installed | grep redis
redis.aarch64                         6.2.6-1.amzn2                  @amzn2extra-redis6
Code language: Bash (bash)
Sure enough, redis-cli is installed.
Use redis-cli to connect to ElastiCache.
First, specify the primary endpoint and connect to the primary node.
sh-4.2$ redis-cli -h fa-063-replicationgroup.ryxnym.ng.0001.apne1.cache.amazonaws.com -p 6379
fa-063-replicationgroup.ryxnym.ng.0001.apne1.cache.amazonaws.com:6379>
Code language: Bash (bash)
Successfully connected.
Save values for testing.
fa-063-replicationgroup.ryxnym.ng.0001.apne1.cache.amazonaws.com:6379> set hoge foo
OK
Code language: Bash (bash)
The file was saved successfully.
Retrieve the saved value.
fa-063-replicationgroup.ryxnym.ng.0001.apne1.cache.amazonaws.com:6379> get hoge
"foo"
Code language: Bash (bash)
Successfully retrieved.
Then specify the reader endpoint and connect to the read replica.
sh-4.2$ redis-cli -h fa-063-replicationgroup-ro.ryxnym.ng.0001.apne1.cache.amazonaws.com -p 6379
fa-063-replicationgroup-ro.ryxnym.ng.0001.apne1.cache.amazonaws.com:6379>
Code language: Bash (bash)
Successfully connected.
Save the values for testing.
fa-063-replicationgroup-ro.ryxnym.ng.0001.apne1.cache.amazonaws.com:6379> set aaa bbb
(error) READONLY You can't write against a read only replica.
Code language: Bash (bash)
Failed.
This is because the read replica is read-only and you do not have write permission.
Check the list of stored value keys.
fa-063-replicationgroup-ro.ryxnym.ng.0001.apne1.cache.amazonaws.com:6379> keys *
1) "hoge"
Code language: Bash (bash)
You can see the key for the value we just stored on the primary node.
Retrieve the value of this key.
fa-063-replicationgroup-ro.ryxnym.ng.0001.apne1.cache.amazonaws.com:6379> get hoge
"foo"
Code language: Bash (bash)
The value was successfully retrieved.
In this way, the value stored on the primary node can be retrieved by the read replica.
For reference, check the IP address of each endpoint.
sh-4.2$ nslookup fa-063-replicationgroup.ryxnym.ng.0001.apne1.cache.amazonaws.com
Server:		10.0.0.2
Address:	10.0.0.2#53

Non-authoritative answer:
fa-063-replicationgroup.ryxnym.ng.0001.apne1.cache.amazonaws.com	canonical name = fa-063-replicationgroup-001.ryxnym.0001.apne1.cache.amazonaws.com.
Name:	fa-063-replicationgroup-001.ryxnym.0001.apne1.cache.amazonaws.com
Address: 10.0.3.34
Code language: Bash (bash)
sh-4.2$ nslookup fa-063-replicationgroup-ro.ryxnym.ng.0001.apne1.cache.amazonaws.com
Server: 10.0.0.2
Address: 10.0.0.2#53
Non-authoritative answer:
fa-063-replicationgroup-ro.ryxnym.ng.0001.apne1.cache.amazonaws.com canonical name = fa-063-replicationgroup-002.ryxnym.0001.apne1.cache.amazonaws.com.
Name: fa-063-replicationgroup-002.ryxnym.0001.apne1.cache.amazonaws.com
Address: 10.0.4.55
Code language: Bash (bash)We can see that they are the primary node and the read replica node, respectively.
We can also see that they are assigned different subnet addresses.
Connecting to ElastiCache for Redis from Lambda Function
Connect to ElastiCache from a Lambda function.
Access the Function URL of this function.
For more information about Function URL, please refer to the following page

The test values stored in the function were successfully retrieved on the primary node read replica.
In this way, you can also connect to ElastiCache for Redis from a Lambda function.
Summary
We have confirmed how to create ElastiCache for Redis (cluster disabled).
We have confirmed that the created ElastiCache can be connected to from EC2 instances and Lambda functions.