Introduction to X-Ray – Tracing incoming requests for Fargate container
X-Ray allows you to trace the actions of an ECS/Fargate container.
In this article, we will use X-Ray to trace incoming requests for Fargate container.
Environment
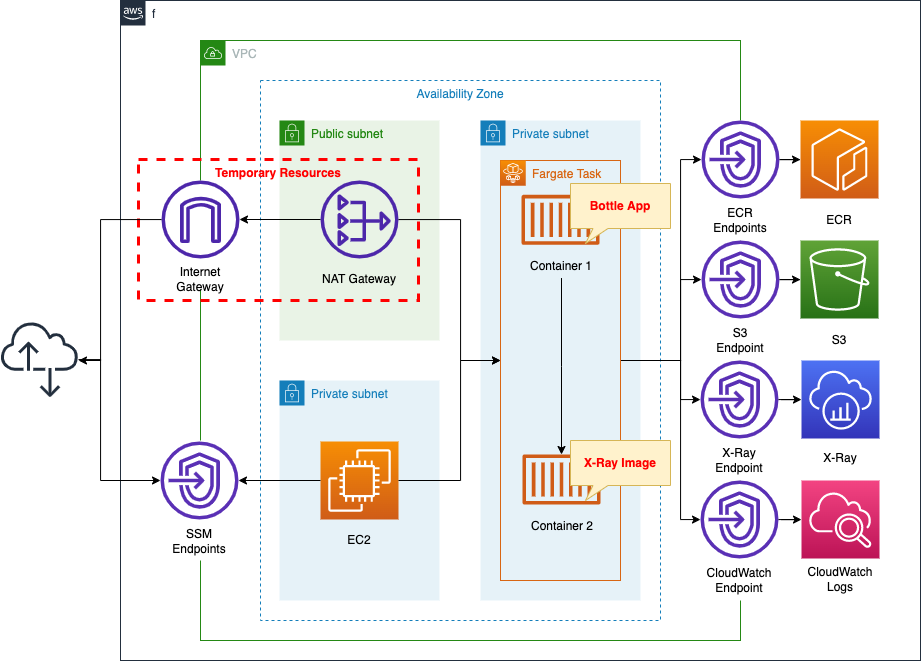
Create a Fargate type ECS on a private subnet.
The tasks that will run on Fargate are A sidecar configuration, including two containers in a single task definition.
The first is an app container: a simple app using the Bottle Python web framework.
The second is the X-Ray daemon container. It delivers trace data uploaded from the aforementioned container to X-Ray via the VPC endpoint described below.
Since Fargate is located on a private subnet, VPC endpoints are created for three uses.
The VPC endpoints for ECR and S3 are used to pull images from ECR.
VPC endpoints for X-Ray and CloudWatch Logs are also created.
Create an EC2 instance.
Use it as a client to access the container.
Create a NAT gateway for two purposes.
The first is to retrieve the X-Ray daemon image from DockerHub.
The second is to install Apache Bench on an EC2 instance. Generate a large number of requests and check the trace data generated.
Once the above uses are completed, the NAT gateway is no longer needed.
In this case, we will use a CloudFormation custom resource to configure the eventual removal of the NAT gateway, etc.
CloudFormation Template Files
The above configuration is built using CloudFormation.
The CloudFormation templates are located at the following URL
https://github.com/awstut-an-r/awstut-fa/tree/main/074
Explanation of key points of the template files
This page is intended to trace the Fargate container using X-Ray.
For more information on how to build Fargate on a private subnet, please refer to the following page
For information on how to use CloudFormation custom resources to remove temporary resources such as NAT gateway, please check the following page
Task Definition
Resources:
  TaskDefinition:
    Type: AWS::ECS::TaskDefinition
    Properties:
      ContainerDefinitions:
        - Cpu: 480
          Image: !Sub "${AWS::AccountId}.dkr.ecr.${AWS::Region}.amazonaws.com/${RepositoryName}:latest"
          MemoryReservation: 768
          Name: !Sub "${Prefix}-main-container"
          PortMappings:
            - ContainerPort: 8080
        - Cpu: 32
          Image: amazon/aws-xray-daemon
          LogConfiguration:
            LogDriver: awslogs
            Options:
              awslogs-group: !Ref LogGroup
              awslogs-region: !Ref AWS::Region
              awslogs-stream-prefix: !Sub "${Prefix}-x-ray-container"
          MemoryReservation: 256
          Name: !Sub "${Prefix}-xray-container"
          PortMappings:
            - ContainerPort: 2000
              Protocol: udp
      Cpu: !Ref TaskCpu
      ExecutionRoleArn: !Ref FargateTaskExecutionRole
      Memory: !Ref TaskMemory
      NetworkMode: awsvpc
      RequiresCompatibilities:
        - FARGATE
      TaskRoleArn: !Ref TaskRole
Code language: YAML (yaml)
In order to upload X-Ray trace data, a sidecar configuration defines two containers within a single task definition.
The first container is the application container.
As described in detail below, the Bottle app listens for HTTP requests on 8080/tcp.
Therefore, in the PortMappings property, specify 8080 for the ContainerPort property.
Now the tcp/8080 traffic directed to this task will be routed to this container.
The second container is the X-Ray daemon container.
The official AWS website introduces two ways to prepare a daemon container.
https://docs.aws.amazon.com/xray/latest/devguide/xray-daemon-ecs.html
The first is to use the official AWS image (amazon/aws-xray-daemon). Just pull this image and you can immediately use the daemon container.
The second method is to create your own image for the daemon container: you can create and use your own daemon container based on Amazon Linux or Ubuntu images.
In this case, we will use the former, i.e., the official image.
Trace data uploaded from the app container is, by default, sent to 2000/udp.
The daemon container needs to receive it, so the PortMappings property should be set accordingly.
To check the behavior of the daemon container, this container will be configured for logging.
For information on how to deliver logs to CloudWatch Logs from Fargate in a private subnet, please see the following page

Image for App Container
Dockerfile
FROM amazonlinux

RUN yum update -y && yum install python3 python3-pip -y

RUN pip3 install bottle
RUN pip3 install aws-xray-sdk

COPY main.py ./

CMD ["python3", "main.py"]

EXPOSE 8080
Code language: Dockerfile (dockerfile)
The image for the app container is created based on Amazon Linux 2.
We will use Bottle, a Python web framework.
So install this after installing Python and pip.
In addition, install the X-Ray SDK for Python (aws-xray-sdk).
Copy the Python script (main.py) that describes the app logic and set it to run.
As mentioned earlier, the app listens for HTTP requests on tcp/8080, so expose this port.
main.py
from aws_xray_sdk.core import xray_recorder
from aws_xray_sdk.ext.bottle.middleware import XRayMiddleware
from bottle import Bottle, route, run

app = Bottle()

xray_recorder.configure(service='fa-074')
plugins = ('ECSPlugin',)
xray_recorder.configure(plugins=plugins)

app.install(XRayMiddleware(xray_recorder))

@app.route('/')
def hello():
  return 'Hello X-Ray!'


if __name__ == '__main__':
  run(app=app, host='0.0.0.0', port=8080)
Code language: Python (python)
The official AWS page shows two ways to trace incoming requests.
https://docs.aws.amazon.com/xray/latest/devguide/xray-sdk-python-middleware.html
The first is to use middleware.
If you use one of the three frameworks (Django, Flask, or Bottle), you can incorporate the X-Ray SDK for Python middleware into them to trace incoming requests.
The second method is to implement the code manually.
If you use a framework other than the above or create segments at arbitrary times, you will be able to trace incoming requests using this method.
In this case, we will use the first method, i.e., incorporating the X-Ray SDK for Python middleware in Bottle.
VPC Endpoints for X-Ray
Resources:
  XRayEndpoint:
    Type: AWS::EC2::VPCEndpoint
    Properties:
      PrivateDnsEnabled: true
      SecurityGroupIds:
        - !Ref EndpointSecurityGroup2
      ServiceName: !Sub "com.amazonaws.${AWS::Region}.xray"
      SubnetIds:
        - !Ref ContainerSubnet
      VpcEndpointType: Interface
      VpcId: !Ref VPC

  EndpointSecurityGroup2:
    Type: AWS::EC2::SecurityGroup
    Properties:
      GroupName: !Sub "${Prefix}-EndpointSecurityGroup2"
      GroupDescription: Allow HTTPS from ContainerSecurityGroup.
      VpcId: !Ref VPC
      SecurityGroupIngress:
        - IpProtocol: tcp
          FromPort: !Ref HTTPSPort
          ToPort: !Ref HTTPSPort
          SourceSecurityGroupId: !Ref ContainerSecurityGroup
Code language: YAML (yaml)
This is a VPC endpoint for delivering data from a private subnet to X-Ray outside the VPC.
Communication to the VPC endpoint will use 443/tcp.
Therefore, create a security group that allows this and assign it to the endpoint.
Specify the security group for Fargate as the source.
(Reference) EC2 instance
Resources:
  Instance:
    Type: AWS::EC2::Instance
    Properties:
      IamInstanceProfile: !Ref InstanceProfile
      ImageId: !Ref ImageId
      InstanceType: !Ref InstanceType
      NetworkInterfaces:
        - DeviceIndex: 0
          SubnetId: !Ref InstanceSubnet
          GroupSet:
            - !Ref InstanceSecurityGroup
      UserData: !Base64 |
        #!/bin/bash -xe
        yum update -y
        yum install httpd -y
Code language: YAML (yaml)
No special configuration is required.
In the UserData property, state that Apache is to be installed when the instance is initialized.
For more information on UserData, please refer to the following page
Architecting
Use CloudFormation to build this environment and check the actual behavior.
Create CloudFormation stacks and check the resources in the stacks
First, create a CloudFormation stack for the ECR repository and push the Docker image to the created ECR.
For more information on this procedure, please refer to the following page

After the image is ready, create the rest of the stack.
For information on how to create nested stacks and check each stack, please refer to the following page

After checking the resources for each stack, information on the main resources created this time is as follows
- ECS cluster: fa-074-cluster
- ECS service: fa-074-service
- ECR repository: fa-074
- X-Ray service: fa-074
- EC2 instance: i-02369a6c48035371e
Check the created resource from the AWS Management Console.
First, check the ECR.
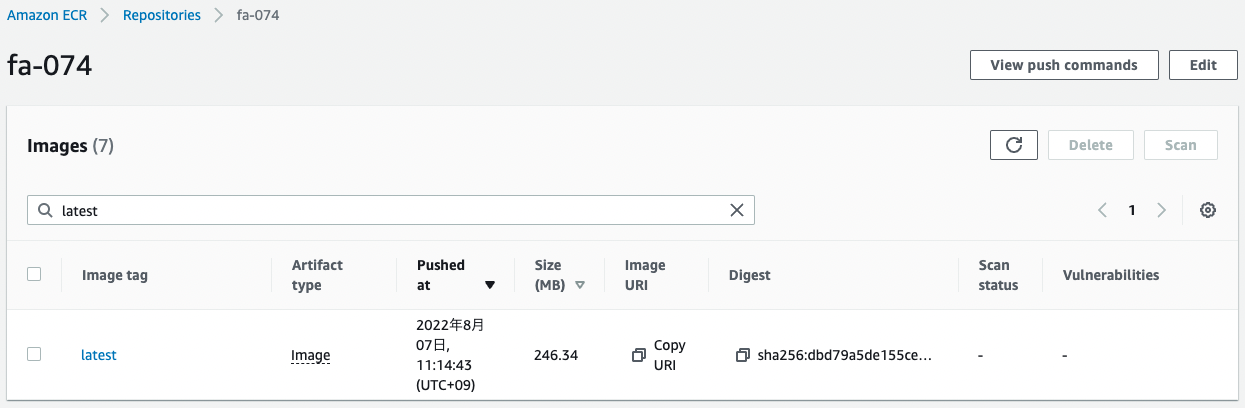
You can see that the ECR repository has been successfully created and the app image has been pushed.
Next, check the ECS Cluster Service.
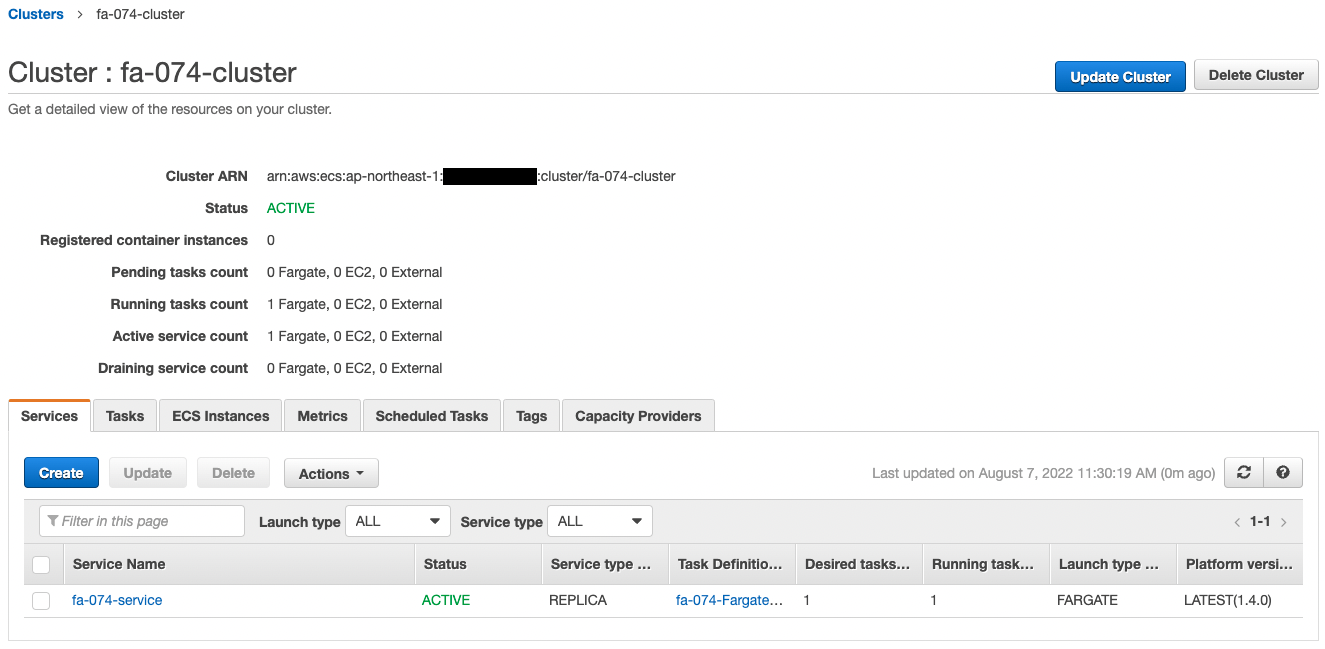
The ECS Cluster Service task is successfully created.
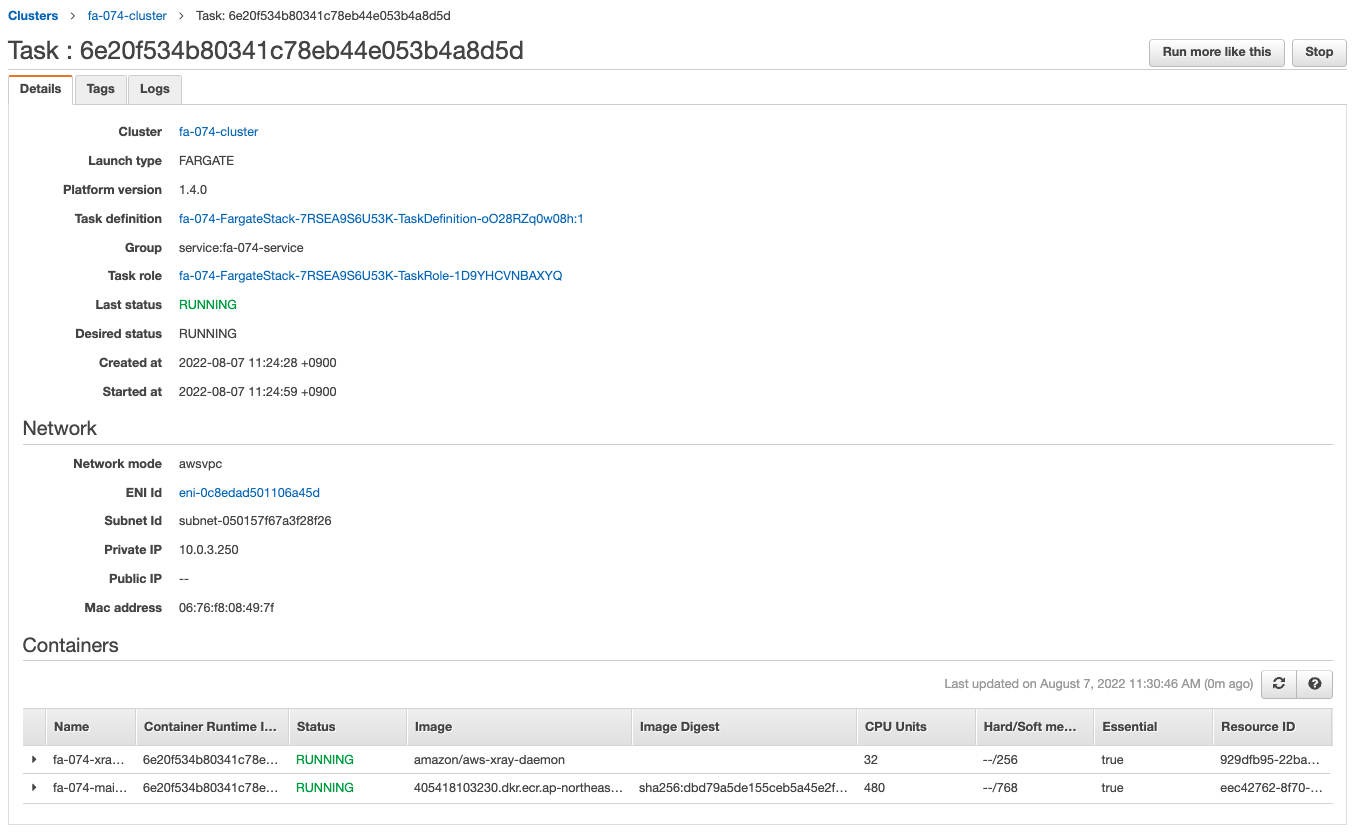
You can see that two containers are created in one task, which is a sidecar configuration.
The app image is obtained from ECR and the X-Ray daemon image from Dockerhub, and containers are created from them.
We can also see that the private address assigned to the task is “10.0.3.250”.
Check the logs delivered from the X-Ray daemon container.
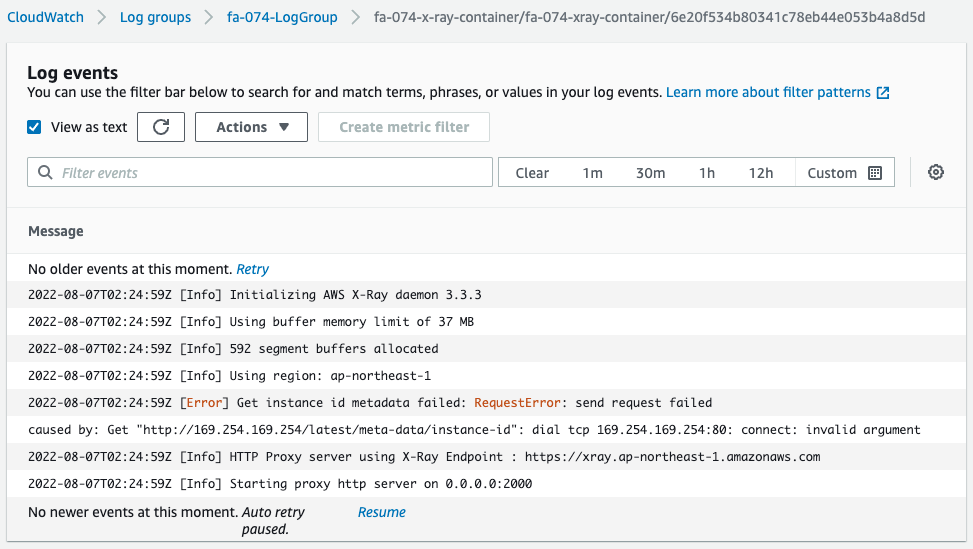
There is an error on the way, but we can see that this container is acting as a proxy server and is listening for trace data in 2000/udp.
Note that this error is an attempt to get the ID of the EC2 instance running ECS, but it failed.
This can be attributed to the fact that we are using Fargate, a managed service for the dataplane.
Checking Action
Now that everything is ready, access the EC2 instance.
Use SSM Session Manager to access the instance.
% aws ssm start-session --target i-02369a6c48035371e

Starting session with SessionId: root-084313930da04829b
sh-4.2$
Code language: Bash (bash)
For more information on SSM Session Manager, please refer to the following page
Access the container in the task using the curl command.
sh-4.2$ curl http://10.0.3.250:8080/
Hello X-Ray!
Code language: Bash (bash)
response is returned.
On Fargate, there are two containers in one task, and when you communicate to the 8080/tcp of this task, the application container responds.
Check the log of the X-Ray daemon container again.
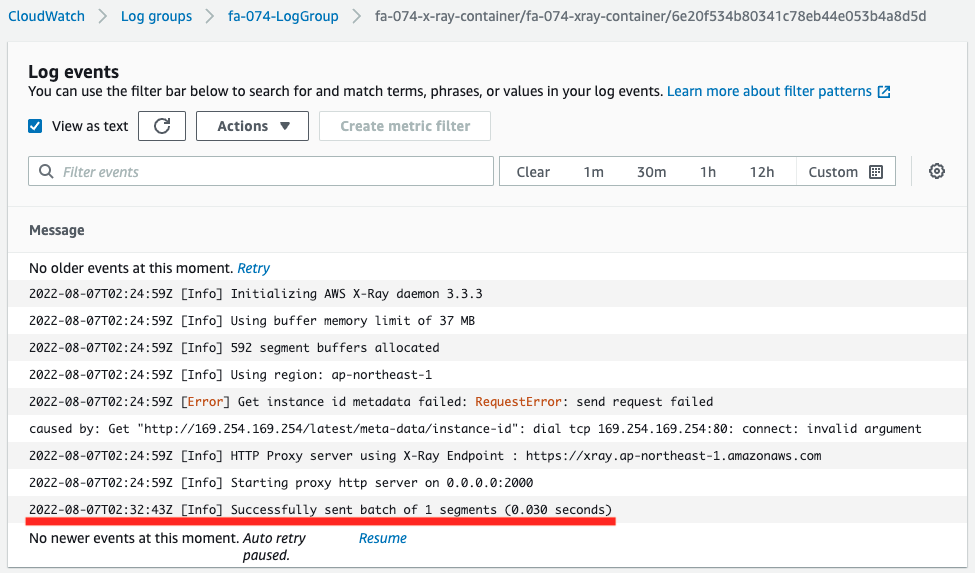
One line of log has been appended.
This log indicates that trace data for one segment has been delivered to X-Ray.
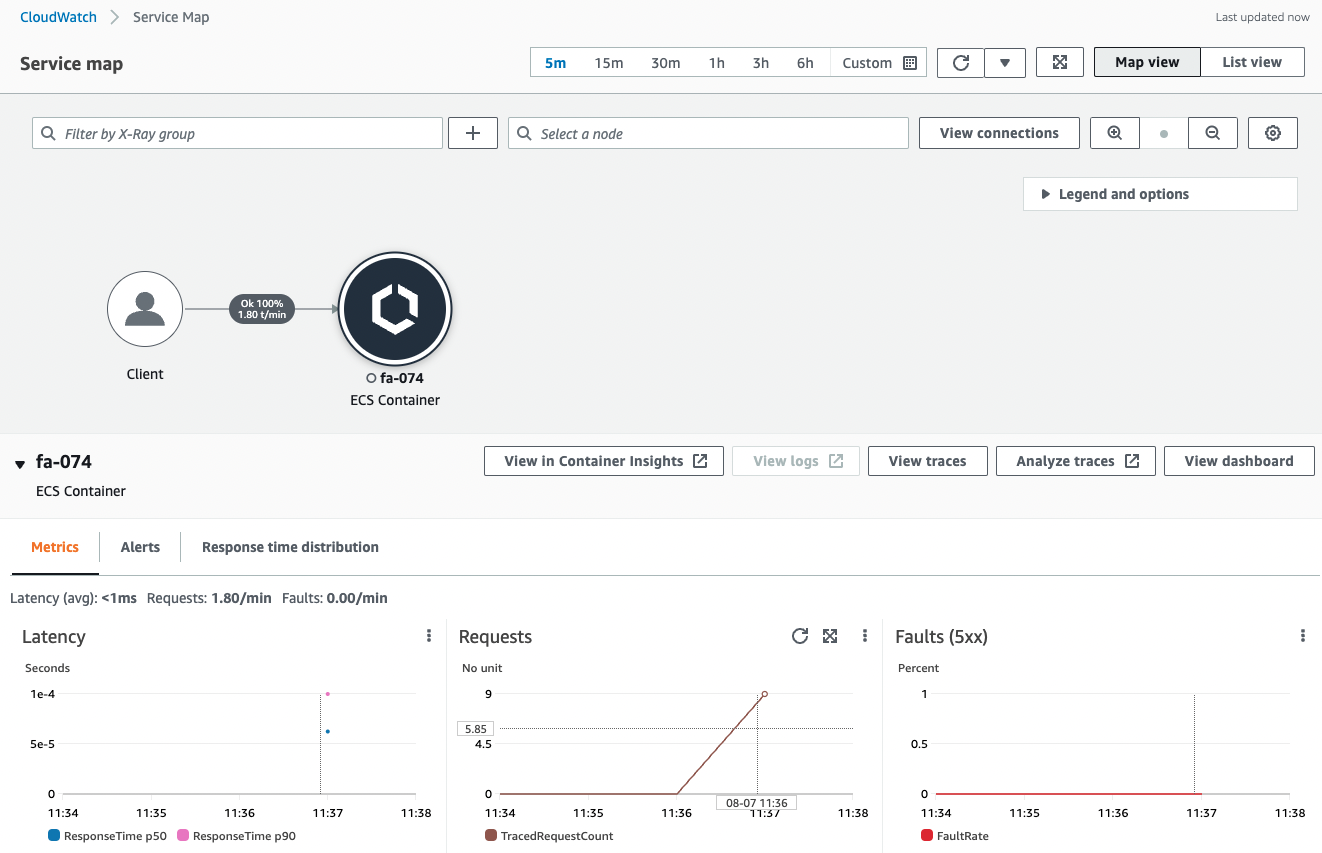
Check the X-Ray page.

You can see that data has been delivered to X-Ray by the previous communication.
The X-Ray page generates a service map and displays statistics on latency, number of requests, and number of errors.
The next step is to check the behavior when a large number of requests are received.
To generate a large number of requests, we use the Apache Bench.
First, make sure Apache is installed.
sh-4.2$ yum list installed | grep httpd
generic-logos-httpd.noarch 18.0.0-4.amzn2 @amzn2-core
httpd.aarch64 2.4.54-1.amzn2 @amzn2-core
httpd-filesystem.noarch 2.4.54-1.amzn2 @amzn2-core
httpd-tools.aarch64 2.4.54-1.amzn2 @amzn2-core
Code language: Bash (bash)
Apache appears to have been successfully installed by the user data.
Run Apache Bench.
Generate 100 requests for a container (task) on Fargate.
sh-4.2$ ab -n 100 http://10.0.3.250:8080/
This is ApacheBench, Version 2.3 <$Revision: 1901567 $>
Copyright 1996 Adam Twiss, Zeus Technology Ltd, http://www.zeustech.net/
Licensed to The Apache Software Foundation, http://www.apache.org/

Benchmarking 10.0.3.250 (be patient).....done


Server Software:        WSGIServer/0.2
Server Hostname:        10.0.3.250
Server Port:            8080

Document Path:          /
Document Length:        12 bytes

Concurrency Level:      1
Time taken for tests:   0.080 seconds
Complete requests:      100
Failed requests:        0
Total transferred:      22600 bytes
HTML transferred:       1200 bytes
Requests per second:    1248.72 [#/sec] (mean)
Time per request:       0.801 [ms] (mean)
Time per request:       0.801 [ms] (mean, across all concurrent requests)
Transfer rate:          275.60 [Kbytes/sec] received

Connection Times (ms)
              min  mean[+/-sd] median   max
Connect:        0    0   0.1      0       0
Processing:     0    1   0.1      1       1
Waiting:        0    0   0.1      1       1
Total:          1    1   0.2      1       2
ERROR: The median and mean for the waiting time are more than twice the standard
       deviation apart. These results are NOT reliable.

Percentage of the requests served within a certain time (ms)
  50%      1
  66%      1
  75%      1
  80%      1
  90%      1
  95%      1
  98%      1
  99%      2
 100%      2 (longest request)
Code language: Bash (bash)
Check the daemon container log again.
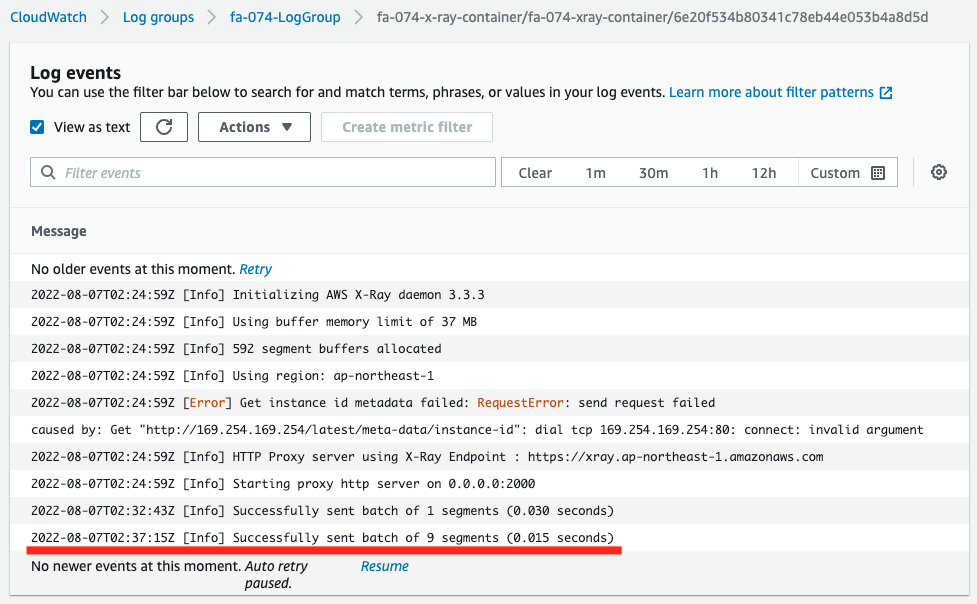
This log shows that out of 100 requests received, 9 segments of trace data were delivered to X-Ray.
X-Ray has a sampling setting, which means that the trace data was extracted and distributed.
The default sampling settings are the following specifications
By default, the X-Ray SDK records the first request each second, and five percent of any additional requests. One request per second is the reservoir. This ensures that at least one trace is recorded each second as long as the service is serving requests. Five percent is the rate at which additional requests beyond the reservoir size are sampled.
Configuring sampling rules in the X-Ray console
Again, check the X-Ray page.
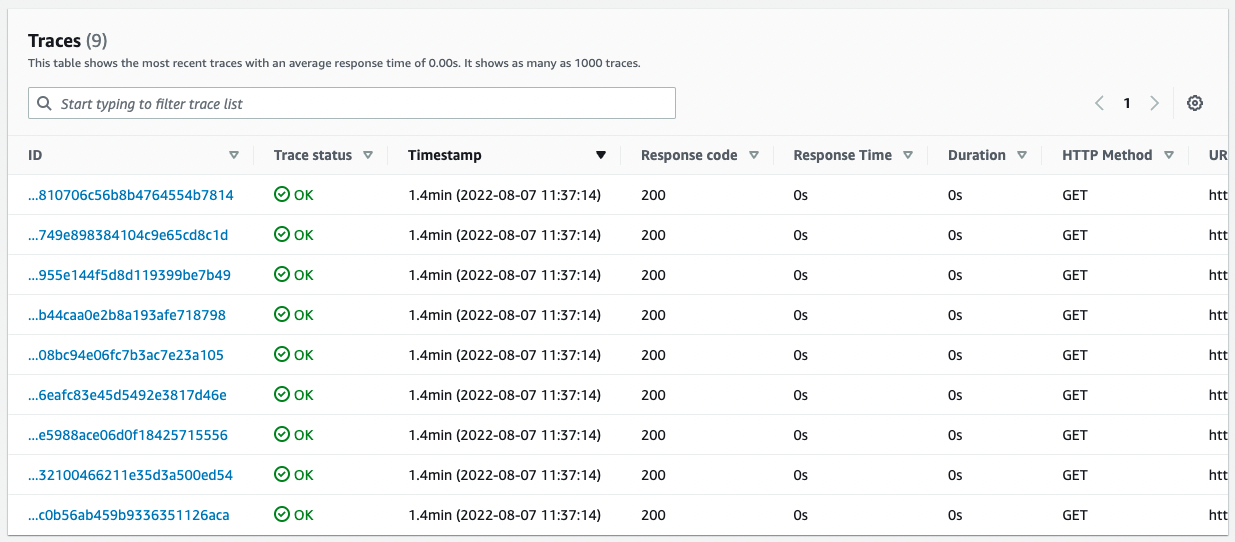
From the sampled data, service map and trace statistics were displayed.
When a large number of requests are received, the data is sampled and processed.
Summary
We have seen how X-Ray can be used to trace incoming requests for the Fargate container.